Getting started with Android Fingerprint Authentication
With the release of Android 6.0 Marshmallow, Google has introduced best way to authenticate the User- That is Fingerprint Authentication.With this API, Google has created a native approach for fingerprint authentication across all Android devices. Developers can now authenticate their users on an app-by-app basis for everything from mobile purchases to app sign-in screens and more with just the tap of a finger.
Why fingerprint authentication?
let’s look at some of the ways in which fingerprint authentication can improve the user experience:
- It’s a quick and convenient way of authenticating the user’s identity.
- You can’t forget a fingerprint!
- No more struggling with mobile keyboards.
- No more annoying password recovery or reset.
- our fingerprint is unique and impossible to guess.
Creating the Fingerprint Authentication Project
Imagine you are developing an app that requires to perform some critical operation like, payment. You want to be sure that your user is authenticated prior wiring any kind of money, right?
Let’s go through a sample application that authenticate the user by fingerprint.
Complete source code for the examples used in this tutorial is available on github.
Creating New Project
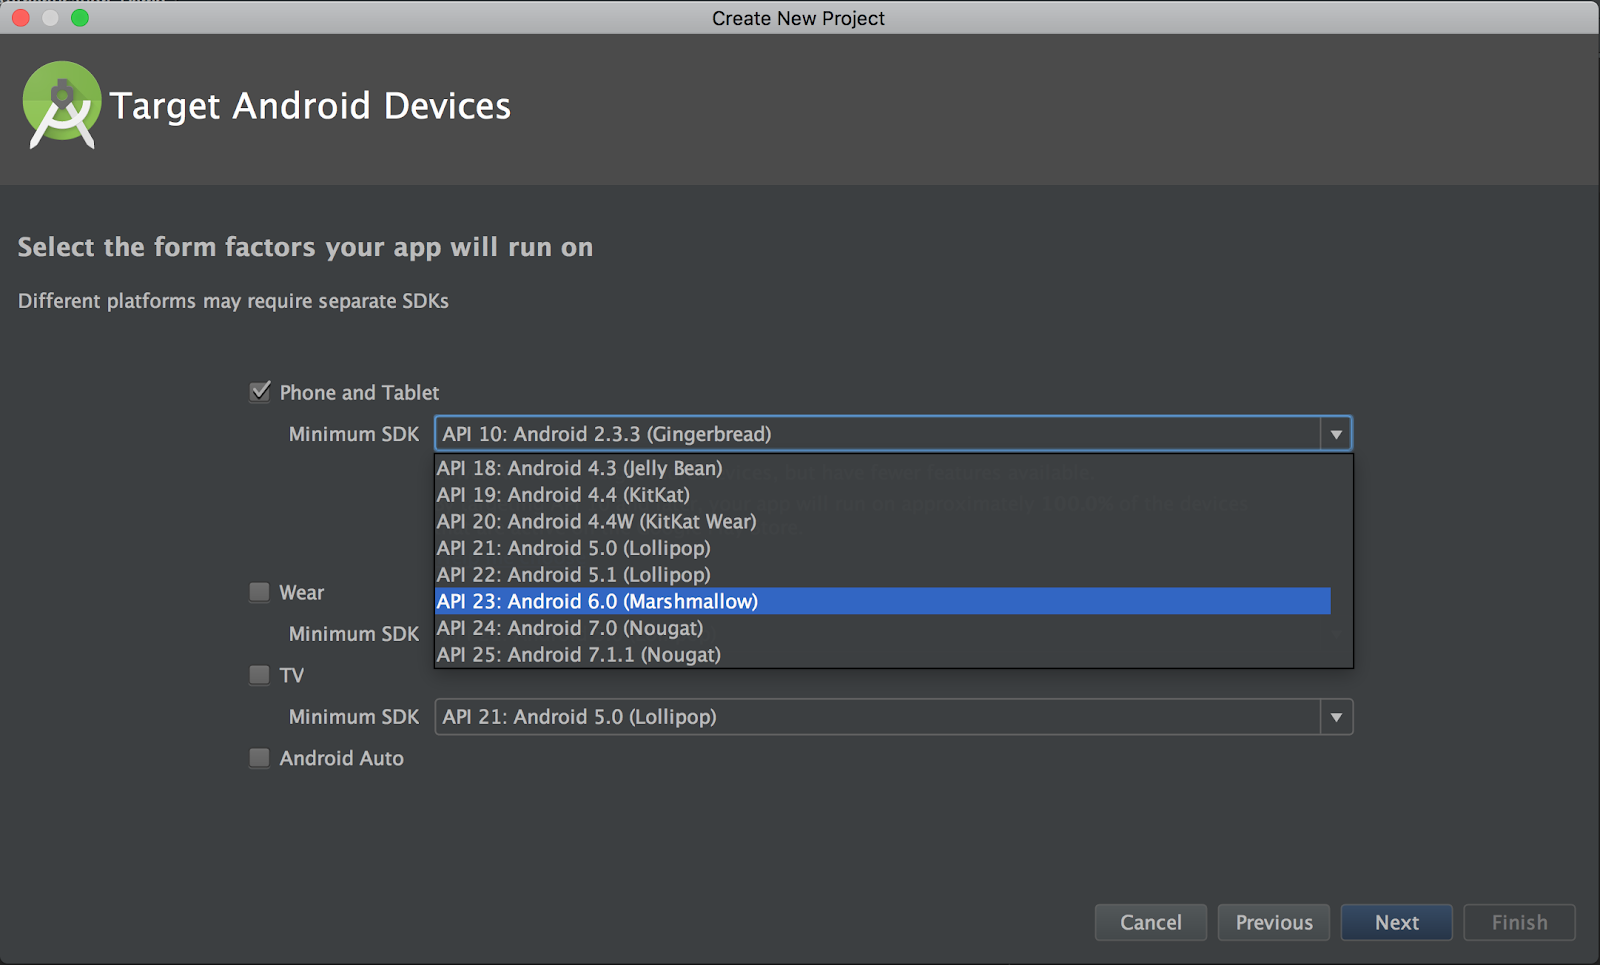
Open Android Studio and create a new project. You can use the settings of your choice, but set your project’s SDK version to Android 6.0 (API 23) or higher.
Updating the Manifest
Fingerprint authentication requires that the app request the USE_FINGERPRINT permission within the project manifest file.
This file contains bidirectional Unicode text that may be interpreted or compiled differently than what appears below. To review, open the file in an editor that reveals hidden Unicode characters.
Learn more about bidirectional Unicode characters
<uses-permission android:name="android.permission.USE_FINGERPRINT" /> |
Creating user interface
Create the fingerprint icon with the help of “Android Image Assets”. To do so, Right click on the drawable folder and Create a New ⇒ Image Asset named ic_action_fingerprint.
Now we have all our resources, let’s create our UI:
This file contains bidirectional Unicode text that may be interpreted or compiled differently than what appears below. To review, open the file in an editor that reveals hidden Unicode characters.
Learn more about bidirectional Unicode characters
<?xml version="1.0" encoding="utf-8"?> | |
<LinearLayout xmlns:android="http://schemas.android.com/apk/res/android" | |
xmlns:app="http://schemas.android.com/apk/res-auto" | |
android:layout_width="match_parent" | |
android:layout_height="match_parent" | |
android:orientation="vertical" | |
android:gravity="center"> | |
<ImageView | |
android:id="@+id/imageViewFinger" | |
android:layout_width="128dp" | |
android:layout_height="128dp" | |
app:srcCompat="@drawable/ic_fingerprint_black_48dp" /> | |
<TextView | |
android:text="Authenticate using fingerprint!" | |
android:layout_width="wrap_content" | |
android:layout_height="wrap_content" | |
android:id="@+id/textView" | |
android:textStyle="bold" | |
android:textColor="@android:color/black" | |
android:layout_marginTop="24dp" | |
android:gravity="center" | |
android:textSize="25sp" /> | |
</LinearLayout> |
Checking the Security Settings
Now time to implement the fingerprint authentication part of our app.As a first step we’re going to check that:
- The device features a fingerprint sensor.
- The user has protected their lockscreen.
- The user has registered at least one fingerprint on their device.
Create a method called checkFingerPrintSensor() on MainAcitivity.java file.
This file contains bidirectional Unicode text that may be interpreted or compiled differently than what appears below. To review, open the file in an editor that reveals hidden Unicode characters.
Learn more about bidirectional Unicode characters
public boolean checkFingerPrintSensor(){ | |
// Initializing both Android Keyguard Manager and Fingerprint Manager | |
KeyguardManager keyguardManager = (KeyguardManager) getSystemService(KEYGUARD_SERVICE); | |
fingerprintManager = (FingerprintManager) getSystemService(FINGERPRINT_SERVICE); | |
try { | |
// Check if the fingerprint sensor is present | |
if (!fingerprintManager.isHardwareDetected()) { | |
// Update the UI with a message | |
messageTextView.setText("Fingerprint authentication not supported"); | |
return false; | |
} | |
if (!fingerprintManager.hasEnrolledFingerprints()) { | |
messageTextView.setText("No fingerprint configured."); | |
return false; | |
} | |
if (!keyguardManager.isKeyguardSecure()) { | |
messageTextView.setText("Secure lock screen not enabled"); | |
return false; | |
} | |
} | |
catch(SecurityException se) { | |
se.printStackTrace(); | |
} | |
return true; | |
} |
Accessing Android Keystore and Generate Encryption Key
We are going to create a method called generateKey() that generate an encryption key which is then stored securely on the device using the Android Keystore system.
The following task are going to do:
- Gain access to the Android keystore, by generating a Keystore instance.
- Initialize the KeyGenerator by Specify the operation(s) this key can be used for
- Configure this key so that the user has to confirm their identity with a fingerprint each time they want to use it
- Generate the key
This file contains bidirectional Unicode text that may be interpreted or compiled differently than what appears below. To review, open the file in an editor that reveals hidden Unicode characters.
Learn more about bidirectional Unicode characters
private static final String KEY_NAME = "OverrideAndroid"; |
This file contains bidirectional Unicode text that may be interpreted or compiled differently than what appears below. To review, open the file in an editor that reveals hidden Unicode characters.
Learn more about bidirectional Unicode characters
@TargetApi(VERSION_CODES.M) | |
public void generateKey() { | |
// Obtain a reference to the Keystore using the standard Android keystore container identifier (“AndroidKeystore”)// | |
try { | |
keyStore = KeyStore.getInstance("AndroidKeyStore"); | |
} catch (KeyStoreException e) { | |
e.printStackTrace(); | |
} | |
// Key generator to generate the key | |
try { | |
//Initialize an empty KeyStore// | |
keyStore.load(null); | |
keyGenerator = KeyGenerator.getInstance(KeyProperties.KEY_ALGORITHM_AES, "AndroidKeyStore"); | |
} catch (NoSuchAlgorithmException | NoSuchProviderException | |
| CertificateException | IOException e) { | |
e.printStackTrace(); | |
} | |
//Specify the operation(s) this key can be used for// | |
KeyGenParameterSpec keyGenParameterSpec = new | |
Builder(KEY_NAME, KeyProperties.PURPOSE_ENCRYPT | |
| KeyProperties.PURPOSE_DECRYPT) | |
.setBlockModes(KeyProperties.BLOCK_MODE_CBC) | |
//Configure this key so that the user has to confirm their identity with a fingerprint each time they want to use it// | |
.setUserAuthenticationRequired(true) | |
.setEncryptionPaddings(KeyProperties.ENCRYPTION_PADDING_PKCS7) | |
.build(); | |
try { | |
keyGenerator.init(keyGenParameterSpec); | |
//Generate the key// | |
keyGenerator.generateKey(); | |
} catch (InvalidAlgorithmParameterException e) { | |
e.printStackTrace(); | |
} | |
} |
Create the Android Cipher
The cipher that will be used to create the encrypted FingerprintManager.CryptoObject instance. This CryptoObject will, in turn, be used during the fingerprint authentication process.
The getInstance method of the Cipher class is called to obtain a Cipher instance which is subsequently configured with the properties required for fingerprint authentication. The previously generated key is then extracted from the Keystore container and used to initialize the Cipher instance.
Create method with name generateCipher() that return a cipher object.
This file contains bidirectional Unicode text that may be interpreted or compiled differently than what appears below. To review, open the file in an editor that reveals hidden Unicode characters.
Learn more about bidirectional Unicode characters
@TargetApi(VERSION_CODES.M) | |
public Cipher generateCipher() { | |
Cipher cipher = null; | |
//Obtain a cipher instance and configure it with the properties required for fingerprint authentication// | |
try { | |
cipher = Cipher.getInstance( | |
KeyProperties.KEY_ALGORITHM_AES + "/" + | |
KeyProperties.BLOCK_MODE_CBC + "/" + | |
KeyProperties.ENCRYPTION_PADDING_PKCS7); | |
} catch (NoSuchAlgorithmException | NoSuchPaddingException e) { | |
e.printStackTrace(); | |
} | |
try { | |
keyStore.load(null); | |
Key key = keyStore.getKey(KEY_NAME, null); | |
cipher.init(Cipher.ENCRYPT_MODE, key); | |
} catch (KeyStoreException | NoSuchAlgorithmException | |
| UnrecoverableKeyException | InvalidKeyException | |
| CertificateException | IOException e) { | |
e.printStackTrace(); | |
} | |
return cipher; | |
} |
Authenticating
We’re ready to authenticate.This is done by calling FingerprintManager’s authenticate(CryptoObject, CancellationSignal, int, AuthenticationCallback, Handler) method.
CryptoObject
The crypto object is passed to fingerprint manager to protect the integrity of the fingerprint authentication.There is a chance that third party can intercept the results returned by fingerprint scanner. Crypto object is used to encrypt the results returned by fingerprint scanner.
CancellationSignal
This gives us the ability to stop listening for fingerprints. In a typical implementation, this class's cancel() method will be called in the onPause() lifecycle method. This ensures we aren’t listening for fingerprints while the application isn’t available.
AuthenticationCallback
This is the listener for fingerprint events. Create an AuthenticationCallback object like below:
This file contains bidirectional Unicode text that may be interpreted or compiled differently than what appears below. To review, open the file in an editor that reveals hidden Unicode characters.
Learn more about bidirectional Unicode characters
AuthenticationCallback authenticationCallback = new AuthenticationCallback() { | |
@Override | |
public void onAuthenticationError(int errorCode, CharSequence errString) { | |
//onAuthenticationError is called when a fatal error has occurred.// | |
//It provides the error code and error message as its parameters// | |
super.onAuthenticationError(errorCode, errString); | |
} | |
@Override | |
public void onAuthenticationHelp(int helpCode, CharSequence helpString) { | |
//onAuthenticationHelp is called when a non-fatal error has occurred. | |
//This method provides additional information about the error// | |
super.onAuthenticationHelp(helpCode, helpString); | |
} | |
@Override | |
public void onAuthenticationSucceeded(AuthenticationResult result) { | |
//onAuthenticationSucceeded is called when a fingerprint has been successfully matched | |
//to one of the fingerprints stored on the user’s device// | |
super.onAuthenticationSucceeded(result); | |
} | |
@Override | |
public void onAuthenticationFailed() { | |
//onAuthenticationFailed is called when the fingerprint doesn’t match | |
//with any of the fingerprints registered on the device// | |
super.onAuthenticationFailed(); | |
} | |
}; |
Finally the onCreate() method will look like this:
This file contains bidirectional Unicode text that may be interpreted or compiled differently than what appears below. To review, open the file in an editor that reveals hidden Unicode characters.
Learn more about bidirectional Unicode characters
@Override | |
protected void onCreate(Bundle savedInstanceState) { | |
super.onCreate(savedInstanceState); | |
setContentView(R.layout.activity_main); | |
messageTextView = (TextView) findViewById(R.id.textView); | |
fingerPrintImageView = (ImageView) findViewById(R.id.imageViewFinger); | |
if (checkFingerPrintSensor()) { | |
generateKey(); | |
Cipher cipher = generateCipher(); | |
if (cipher != null) { | |
//If the cipher is initialized successfully, then | |
// create a CryptoObject instance// | |
CryptoObject cryptoObject = new CryptoObject(cipher); | |
CancellationSignal cancellationSignal = new CancellationSignal(); | |
if (ActivityCompat.checkSelfPermission(this, permission.USE_FINGERPRINT) != PackageManager.PERMISSION_GRANTED) { | |
return; | |
} | |
fingerprintManager.authenticate(cryptoObject, cancellationSignal, 0, authenticationCallback, null); | |
} | |
} | |
} |
Updating user interface
Next step is to update the user interface with authentication success or failure.Just create two method to handle this.
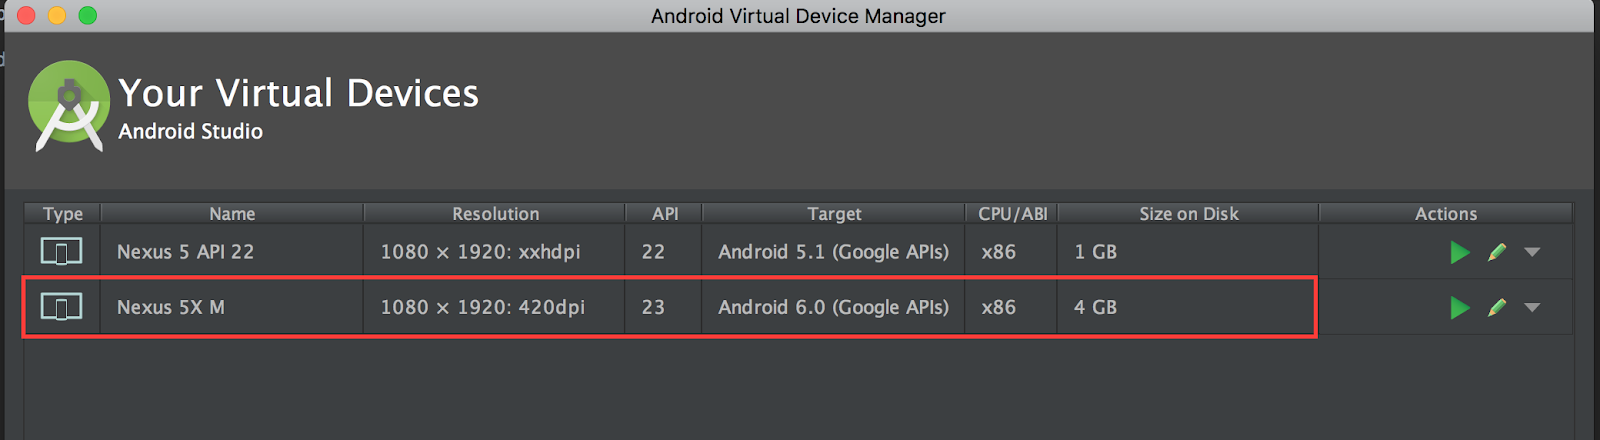
This file contains bidirectional Unicode text that may be interpreted or compiled differently than what appears below. To review, open the file in an editor that reveals hidden Unicode characters.
Learn more about bidirectional Unicode characters
public void showAuthSucceededMessage() { | |
fingerPrintImageView.setImageResource(R.drawable.ic_fingerprint_green_500_48dp); | |
messageTextView.setText("Authentication succeeded."); | |
} | |
public void showAuthFailedMessage() { | |
fingerPrintImageView.setImageResource(R.drawable.ic_fingerprint_red_500_48dp); | |
messageTextView.setText("Authentication failed."); | |
} |
This file contains bidirectional Unicode text that may be interpreted or compiled differently than what appears below. To review, open the file in an editor that reveals hidden Unicode characters.
Learn more about bidirectional Unicode characters
@Override | |
public void onAuthenticationSucceeded(AuthenticationResult result) { | |
super.onAuthenticationSucceeded(result); | |
showAuthSucceededMessage(); | |
} | |
@Override | |
public void onAuthenticationFailed() { | |
super.onAuthenticationFailed(); | |
showAuthFailedMessage(); | |
} |
Testing the project
Whenever you’re working on an Android app, you should test that app across a wide range of Android Virtual Devices (AVDs) plus at least one physical Android smartphone or tablet.
First, make sure your Android smartphone or tablet is configured to support fingerprint authentication by securing your lockscreen with a PIN, password or pattern and then registering at least one fingerprint on your device. Typically, you register a fingerprint by going to Settings ⇒ Security ⇒ Fingerprint and then following the onscreen instructions.
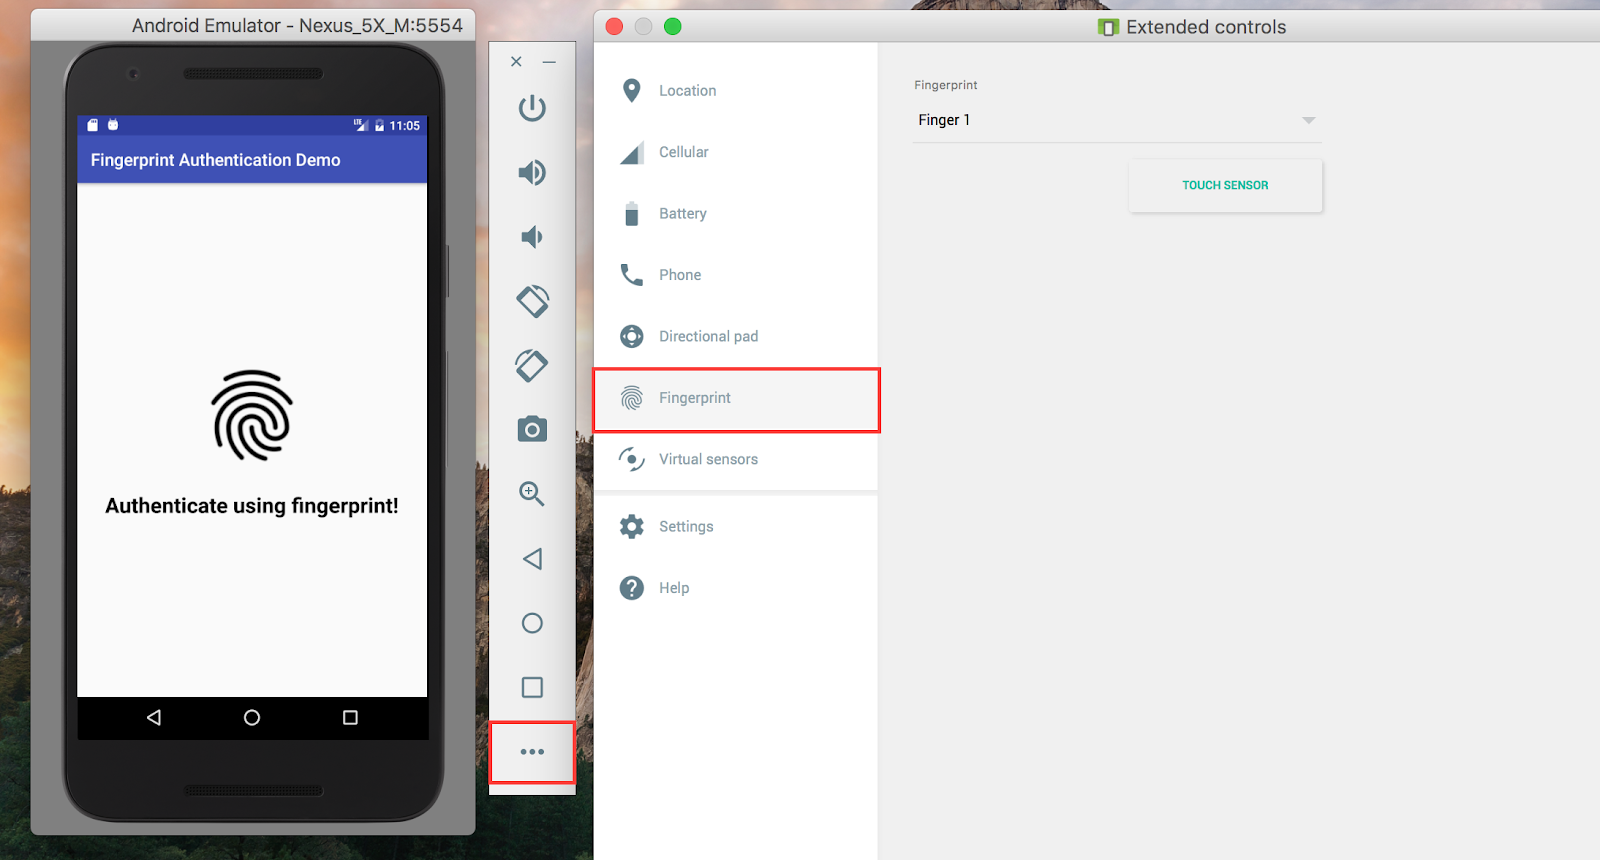
When it comes to testing Android’s fingerprint authentication on an AVD, there’s an immediate problem: an emulated Android device doesn’t have any physical hardware.The solution is to use the extended controls of the AVD.
How to display the finger scan results based on the id, the example displays the results of a different finger scan, so each finger d scan and display the scan results
ReplyDeleteHi,
DeleteIt's not possible. Registered fingerprints are treated equally.
Because each registered fingerprint can unlock device for the account who registered the fingerprint equally. At least for now, these are treated as equally.
Maybe in the future, there is a change that identify multiple fingerprints. But current Android M doesn't support it.