How to Use Kotlin in Your Android Projects
One great news of moving to Kotlin is, do not need to start from a new project. You could add it to your existing Java Android project. The language is interoperable with Java. So you could use steps below either for a new or existing project.
Setting up Your Environment
By default, Android Studio has no idea what to do with Kotlin, so the first step is to install the Kotlin plugin and configure Kotlin in your project.
Installing the Kotlin Plugin
Launch Android Studio and install the kotlin plugin.
-
In Android Studio's quick start menu, select Configure >> Plugins.
-
click on Install JetBrains plugin…
-
Search for and select Kotlin from the list and click Install.
-
When the installation completes, restart Android Studio to activate the plugins.
In Android Studio's quick start menu, select Configure >> Plugins.
click on Install JetBrains plugin…
Search for and select Kotlin from the list and click Install.
When the installation completes, restart Android Studio to activate the plugins.
Configuring Your Project to Use Kotlin
Now IDE can understand and run Kotlin code, but need to configure kotlin for every project.
Create a new project in Android Studio from File >> New Project by filling the required details.
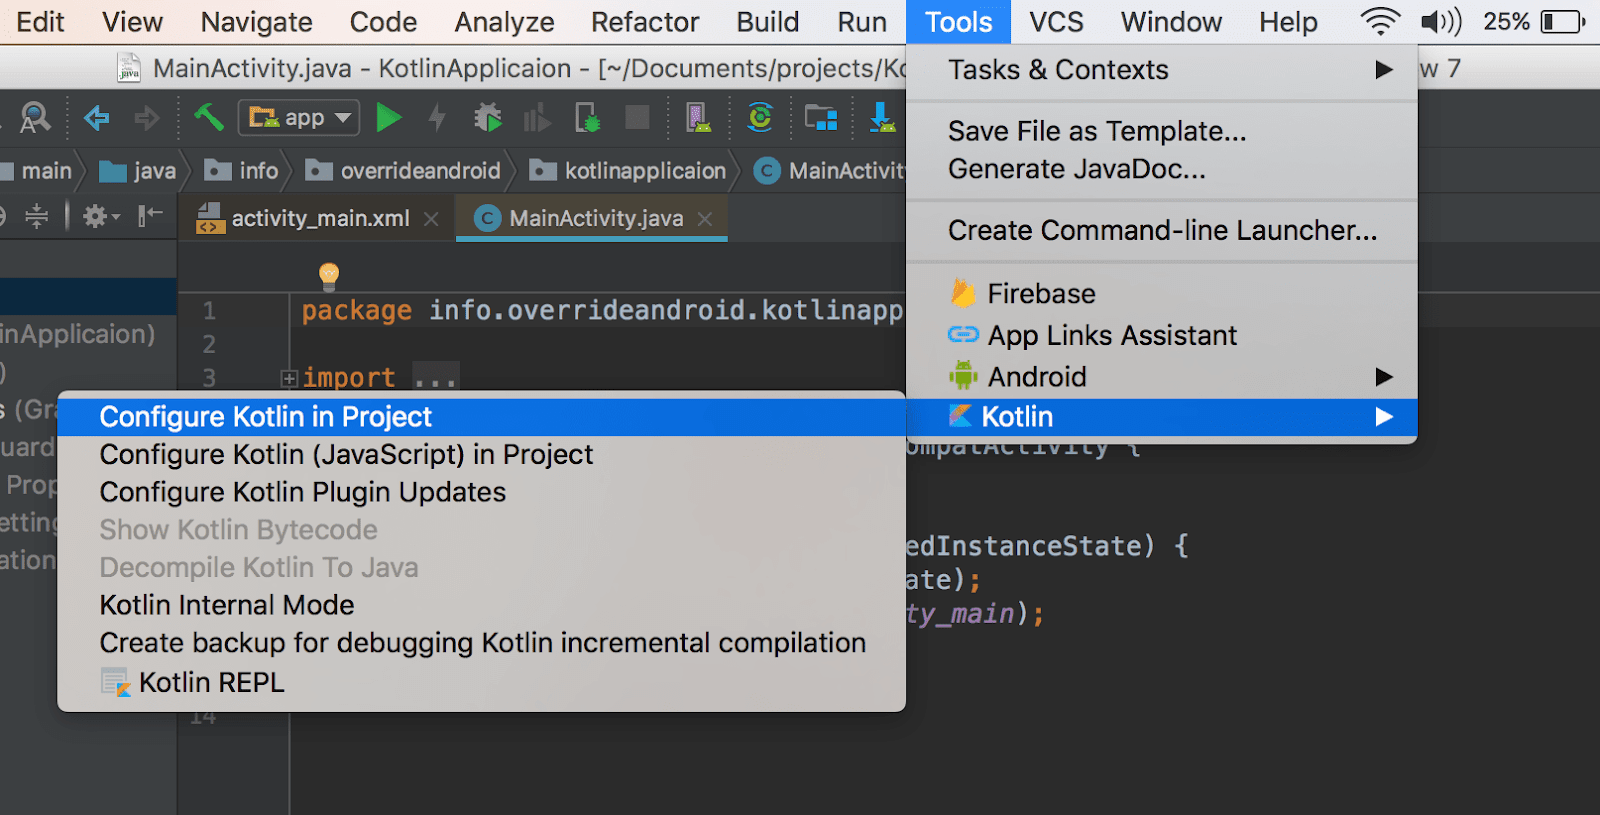
Select Tools from the Android Studio toolbar, followed by Kotlin and Configure Kotlin in Project.
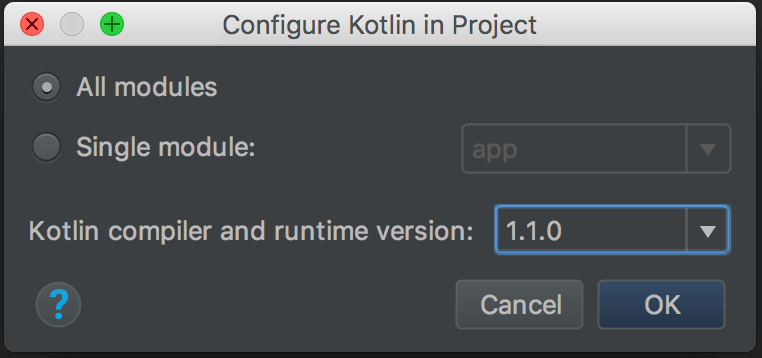
On the Configure Kotlin in Project popup, select the plugin version you want to use and click OK.
The Configure Kotlin in Project option makes a number of changes to your project’s build.gradle files, so let’s take a closer look at how these files have changed. Open your project-level build.gradle file. it should look something like this:
This file contains bidirectional Unicode text that may be interpreted or compiled differently than what appears below. To review, open the file in an editor that reveals hidden Unicode characters.
Learn more about bidirectional Unicode characters
// Top-level build file where you can add configuration options common to all sub-projects/modules.
buildscript {
ext.kotlin_version = '1.1.0'
repositories {
jcenter()
}
dependencies {
classpath 'com.android.tools.build:gradle:2.4.0-alpha7'
classpath "org.jetbrains.kotlin:kotlin-gradle-plugin:$kotlin_version"
// NOTE: Do not place your application dependencies here; they belong
// in the individual module build.gradle files
}
}
allprojects {
repositories {
jcenter()
}
}
Now, let’s take a look at your module-level build.gradle file:
This file contains bidirectional Unicode text that may be interpreted or compiled differently than what appears below. To review, open the file in an editor that reveals hidden Unicode characters.
Learn more about bidirectional Unicode characters
apply plugin: 'com.android.application'
apply plugin: 'kotlin-android'
android {
compileSdkVersion 25
buildToolsVersion "25.0.2"
defaultConfig {
applicationId "info.overrideandroid.myapplication"
minSdkVersion 23
targetSdkVersion 25
versionCode 1
versionName "1.0"
}
}
dependencies {
compile 'com.android.support:appcompat-v7:25.3.1'
compile "org.jetbrains.kotlin:kotlin-stdlib-jre7:$kotlin_version"
compile 'com.android.support:design:25.3.1'
}
repositories {
mavenCentral()
}
Click on Sync Now to build the project.
This file contains bidirectional Unicode text that may be interpreted or compiled differently than what appears below. To review, open the file in an editor that reveals hidden Unicode characters.
Learn more about bidirectional Unicode characters
// Top-level build file where you can add configuration options common to all sub-projects/modules. | |
buildscript { | |
ext.kotlin_version = '1.1.0' | |
repositories { | |
jcenter() | |
} | |
dependencies { | |
classpath 'com.android.tools.build:gradle:2.4.0-alpha7' | |
classpath "org.jetbrains.kotlin:kotlin-gradle-plugin:$kotlin_version" | |
// NOTE: Do not place your application dependencies here; they belong | |
// in the individual module build.gradle files | |
} | |
} | |
allprojects { | |
repositories { | |
jcenter() | |
} | |
} |
This file contains bidirectional Unicode text that may be interpreted or compiled differently than what appears below. To review, open the file in an editor that reveals hidden Unicode characters.
Learn more about bidirectional Unicode characters
apply plugin: 'com.android.application' | |
apply plugin: 'kotlin-android' | |
android { | |
compileSdkVersion 25 | |
buildToolsVersion "25.0.2" | |
defaultConfig { | |
applicationId "info.overrideandroid.myapplication" | |
minSdkVersion 23 | |
targetSdkVersion 25 | |
versionCode 1 | |
versionName "1.0" | |
} | |
} | |
dependencies { | |
compile 'com.android.support:appcompat-v7:25.3.1' | |
compile "org.jetbrains.kotlin:kotlin-stdlib-jre7:$kotlin_version" | |
compile 'com.android.support:design:25.3.1' | |
} | |
repositories { | |
mavenCentral() | |
} |
Convert Any Java File to Kotlin
One of the feature of kotlin plugin is that we can convert a java classes to kotlin classes.
Let's convert MainActivity file into a Kotlin source file by invoking the Kotlin plugin’s Convert Java File to Kotlin File action.
Select your MainActivity file, and then select Code from Android Studio’s menu bar, followed by Convert Java File to Kotlin File.
Your newly-converted MainActivity should look something like this:
This file contains bidirectional Unicode text that may be interpreted or compiled differently than what appears below. To review, open the file in an editor that reveals hidden Unicode characters.
Learn more about bidirectional Unicode characters
package info.overrideandroid.myapplication
import android.support.v7.app.AppCompatActivity
import android.os.Bundle
class MainActivity : AppCompatActivity() {
override fun onCreate(savedInstanceState: Bundle?) {
super.onCreate(savedInstanceState)
setContentView(R.layout.activity_main)
}
}
Notice that the file's extension has changed from .java to .kt.
This file contains bidirectional Unicode text that may be interpreted or compiled differently than what appears below. To review, open the file in an editor that reveals hidden Unicode characters.
Learn more about bidirectional Unicode characters
package info.overrideandroid.myapplication | |
import android.support.v7.app.AppCompatActivity | |
import android.os.Bundle | |
class MainActivity : AppCompatActivity() { | |
override fun onCreate(savedInstanceState: Bundle?) { | |
super.onCreate(savedInstanceState) | |
setContentView(R.layout.activity_main) | |
} | |
} |
Using Kotlin Android Extensions
The Kotlin Android Extensions plugin allow you to use the widgets in the layout XML directly in activity without calling the findViewById method.
Add org.jetbrains.kotlin:kotlin-android-extensions as a build script dependency in app module's build.gradle.
This file contains bidirectional Unicode text that may be interpreted or compiled differently than what appears below. To review, open the file in an editor that reveals hidden Unicode characters.
Learn more about bidirectional Unicode characters
buildscript {
ext.kotlin_version = '1.1.0'
dependencies {
classpath "org.jetbrains.kotlin:kotlin-android-extensions:$kotlin_version"
}
}
Create a Kotlin class, KotlinActivity, that extends Activity and override its onCreate method.
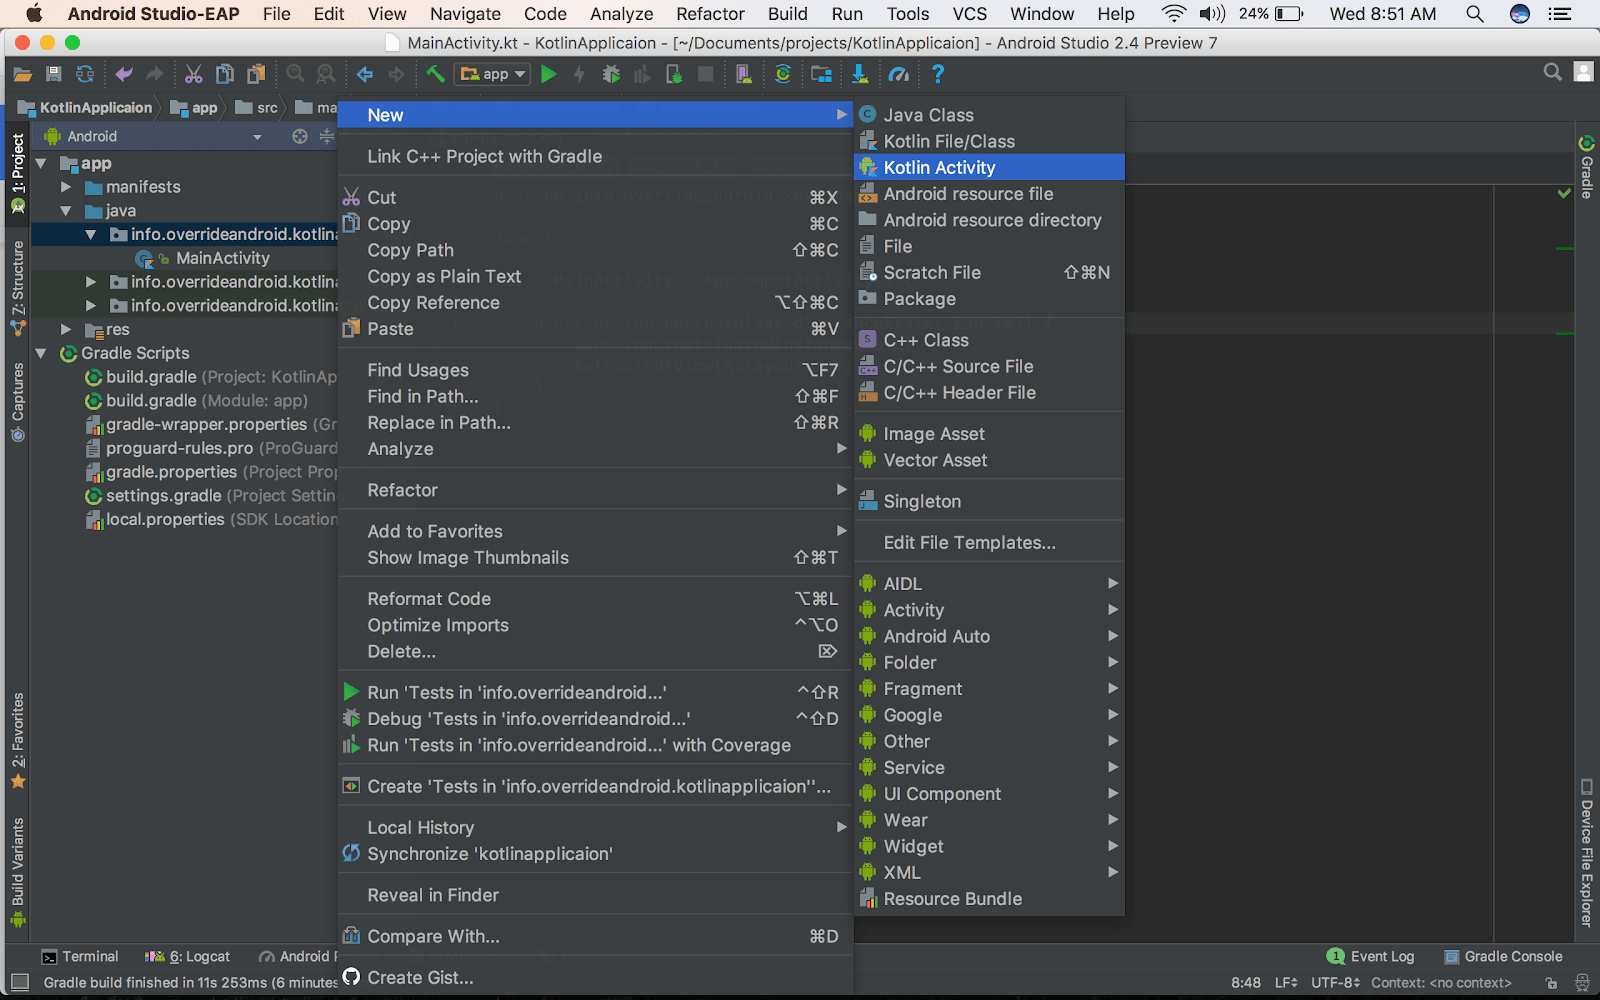
To create a Kotlin file, right your app/src/main/ directory and select New >> Kotlin Activity.

This file contains bidirectional Unicode text that may be interpreted or compiled differently than what appears below. To review, open the file in an editor that reveals hidden Unicode characters.
Learn more about bidirectional Unicode characters
package info.overrideandroid.kotlinapplicaion
import android.support.v7.app.AppCompatActivity
import android.os.Bundle
class MainActivity : AppCompatActivity() {
override fun onCreate(savedInstanceState: Bundle?) {
super.onCreate(savedInstanceState)
setContentView(R.layout.activity_main)
}
}
In the layout XML file, define a TextView with an id of messageTextview.
This file contains bidirectional Unicode text that may be interpreted or compiled differently than what appears below. To review, open the file in an editor that reveals hidden Unicode characters.
Learn more about bidirectional Unicode characters
<?xml version="1.0" encoding="utf-8"?>
<LinearLayout xmlns:android="http://schemas.android.com/apk/res/android"
android:orientation="vertical" android:layout_width="match_parent"
android:layout_height="match_parent">
<TextView
android:layout_width="wrap_content"
android:layout_height="wrap_content"
android:textAppearance="?android:attr/textAppearanceLarge"
android:text="text"
android:id="@+id/messageTextview" />
</LinearLayout>
Now, instead of calling findViewById to get a reference to the TextView, you can import it using the following code snippet:
import kotlinx.android.synthetic.another_activity.myMessage
If you had more widgets in your layout, you can import all of them using the following code snippet:
import kotlinx.android.synthetic.another_activity.*
Now access TextView using its id messageTextview.
messageTextview.setText("Hello")
In this tutorial, you have learned how to use Kotlin in your Android projects after installing the Kotlin plugin and the Kotlin Android Extensions plugin for Android Studio. As Kotlin and Java classes are largely interoperable, if you are still learning Kotlin, it is best to introduce it in your Android projects gradually.
This file contains bidirectional Unicode text that may be interpreted or compiled differently than what appears below. To review, open the file in an editor that reveals hidden Unicode characters.
Learn more about bidirectional Unicode characters
buildscript { | |
ext.kotlin_version = '1.1.0' | |
dependencies { | |
classpath "org.jetbrains.kotlin:kotlin-android-extensions:$kotlin_version" | |
} | |
} |
This file contains bidirectional Unicode text that may be interpreted or compiled differently than what appears below. To review, open the file in an editor that reveals hidden Unicode characters.
Learn more about bidirectional Unicode characters
package info.overrideandroid.kotlinapplicaion | |
import android.support.v7.app.AppCompatActivity | |
import android.os.Bundle | |
class MainActivity : AppCompatActivity() { | |
override fun onCreate(savedInstanceState: Bundle?) { | |
super.onCreate(savedInstanceState) | |
setContentView(R.layout.activity_main) | |
} | |
} |
This file contains bidirectional Unicode text that may be interpreted or compiled differently than what appears below. To review, open the file in an editor that reveals hidden Unicode characters.
Learn more about bidirectional Unicode characters
<?xml version="1.0" encoding="utf-8"?> | |
<LinearLayout xmlns:android="http://schemas.android.com/apk/res/android" | |
android:orientation="vertical" android:layout_width="match_parent" | |
android:layout_height="match_parent"> | |
<TextView | |
android:layout_width="wrap_content" | |
android:layout_height="wrap_content" | |
android:textAppearance="?android:attr/textAppearanceLarge" | |
android:text="text" | |
android:id="@+id/messageTextview" /> | |
</LinearLayout> |
Thanks for your marvelous posting! I definitely enjoyed reading it, you can be a great author.I will always bookmark your blog and will eventually come back very soon. I want to encourage you continue your great posts, have a nice morning! gmail login email
ReplyDeleteI was so pleased to hear from you :)
DeleteIl nostro team si occupa della realizzazione di siti web, anche e-commerce app Android.
ReplyDeleteI am glad that I came here and discovered lots of valuable data from your article. It is a beneficial and convenient article for us to increase knowledge. Thanks for sharing an article like this. How to install Android on PC
ReplyDelete